

Tools Needed
Needle nose pliers
Sharp pointed scissors (I used my pocket knife’s scissors)
7 mm hex screw driver
Small flat head screw driver
Drill with 5/8” and 1/16” bits
File
Pocket knife
Scotch Tape
Installation on manual passenger seat
Using the seat height lever on the side, lift the seat as far as it goes. On my ECO MT this gave me enough space to make a fist under the front of the seat and move it up and down about an inch.
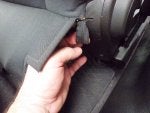
Push the seat forward on the rails to give you room to reach under from behind. Reaching under the seat there will be two straps that stretch forward from the edge of the seat fabric. These straps end in plastic hooks that are about a third of an inch long. Pull the hooks forward until they come free. The bottom flap for the seat back will drop down.
![]()
![]()
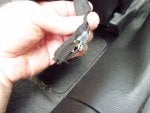
Next, pull the end of the zippers from where they are tucked in behind the plastic seat corner on each rear corner. Carefully, and I mean carefully, unzip both zippers. I had one “split” and I ended up having to repair a zipper.
![]()
![]()
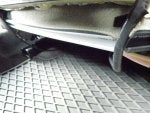
The seat cover is clipped onto the base and back. The base clip goes all the way across the base of the seat. The seat back fabric clip is one long plastic piece. The seat cushion is a short clip and a longer clip. The short clip just slides off. Use the flat head screw driver to very carefully separate the rest of the clip.
![]()
![]()
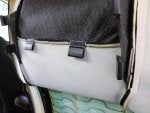
As you lift the seat back fabric you will find two clips going up each side and then two clips about half way up the seat back. Carefully remove these clips. Lift the seat back fabric and hook it around the raised head rest supports. Use the clips from under the seat to hold it in place. You are now ready to start the install.
![]()
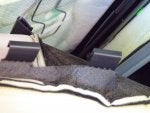
Carefully slide the air bladder up between the metal grid and the foam seat back cushion. Face the bladder to the front so the protective “hard” plastic is pressed against the spring grid. This is a tight fit to start but once started it’s easy to move the air bladder around. Route the air hose out the lower inboard corner. Be careful to not kink the air hose.
![]()
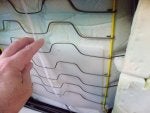
Next use the scotch tape to secure the drill mask to the middle front of the plastic door side seat support. You want to cut a hole that fits the mask. I used a drill to drill some 5/8” overlapping holes to start the hole. I then used the file, pocket knife main blade, and drill with 1/16” bit to increase the size of the hole to fit the template. Put the control cable into this hole and very carefully snake it over the top of the interior frame. Go over the frame to avoid interfering with the forward/rearward movement of the seat on the rails. Put the cable in so the switch’s bulge is to the front. Pressing this bulge will inflate the bladder.
Under the seat there is another flap of fabric. This flap is also held to the seat bottom by a pair of stretch straps. Unclip them. Plug the air hose into the pump and then while holding the pump under the seat, reclip this flap over the pump. Zip tie the pump to the bottom of the seat.
Slide both seats all the way forward. On each side of the center console you will see a hex head screw. Remove both. Slide both seats all the way backwards. Using your fingers, carefully lift the gear shift trim and then lift the silver trim from around your shifter. Reach under the silver trim from the gear shift side. Start at the back and work your way forward unclipping as you go. Do NOT use a screw driver to lift as this plastic is very, very soft and a screwdriver will leave marks in the finish. Detailed instructions for this are in the first post of http://www.cruzetalk.com/forum/137-...dio-electrical-tutorials/5833-diy-bluetooth-a2dp-bluetooth-audio-streaming.html. Once the silver piece is removed flip it over and unscrew the traction control off button from the underside. Set the cover aside.
Next remove both inboard kick plates. Start from the bottom front of each plate and work your way back. There are two screws on each side of the center console that you unscrewed in the rear. Lower corner under the rear corner of the kick plates and on the front of the console just under the A/C control unit. Remove all four screws. Pay attention to your screws here as there are two screws close together on the top of the console. The lower screw on each side is the console cover and the upper secures the A/C controls. You can now lift the center console but it won’t come all the way out due to electrical cables.
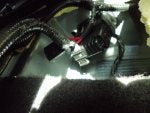
From the front of the seat you can plug both the control cable and the power cable into the pump. Run the power cable over the seat frame. Note where the existing power cable dives into the floor. We’re going in there as well. Lift the floor flaps back and snake the cable under the front inboard corner and up into the center console area. You can slide your fingers in from the console side and catch the cable plugs and pull it through. On the front of the connector you'll see a flat plastic "cover". Pull this cover to unplug the connector, then you can remove remove the other half of the connector easily to give yourself more room to work the Rostra power cable under the floor padding and into the center console area. Resecure the existing plug in reverse order. The pull plastic now is a push plastic once properly seated. Very little force is needed to remove and resecure this connection.
![]()
Using a zip tie, secure the fuse to the top of the connector in the floor. This keeps it above any snow melt or other water that may find it’s way into this area and ensure sufficient slack under the seat to move it back and forth. Pull the power cable through all the way into the center console.
Slide the driver’s seat all the way back and lift the back of the center console and sit it on the top of the seat belt clasp stalks. Carefully reach up under the back of the seat and unclip the rear power outlet cable and pull it out to where you can see about four inches of cable. If you look under the front of the console you will see the same set up. Using the scicssors carefully cut back about two inches of the wrap from the power connector. Using the wire connector pinches put one on each electrical line. The Rostra black wire plugs into the black wire for the power clip. The Rostra red wire plugs into the purple wire clip.
Turn the ignition to power/run and and test. Pushing the button forward should increase lumbar support. Pushing it back while sitting in the seat will reduce lumbar support.
Plug the back power outlet back together and then use the zip ties to secure the Rostra power cable to the power cable that runs to the back of the console. There is extra space under the center console so you can leave the extra Rostra cable in there. Put the console back down into place and reattach the front of the console with the four screws. Reinstall the kick plates by inserting the front tab and then the rear tabs. Press the clips back into place. Reconnect the traction control switch to the silver trim and clip the trim back into place. Reseat the trim around the gear shift. Close up the floor flap.
Before securing the air bladder have the primary passenger test the position of the lumbar support. Once it’s good use zip ties to secure the bladder in place. Flip the seat cover back down and reconnect the two top clips and four side clips (two on each side). Reconnect the long clips at the bottom of the seat. Using your needle nose pliers pull down the two zippers. Be careful when you get to the bottom of the seats as this is where my zipper came apart. Tuck the zippers back in. Reclip the two bottom tabs under the seat.
Enjoy your new lumbar support.
Thanks to XtremeRevolution for putting together the Rostra CruzeTalk discount and for his write up. He has aftermarket leather seats in his car so my seat work is different. I didn’t feel like routing wires all the way to the fuse box so I used the existing 12v power outlet wiring.
Needle nose pliers
Sharp pointed scissors (I used my pocket knife’s scissors)
7 mm hex screw driver
Small flat head screw driver
Drill with 5/8” and 1/16” bits
File
Pocket knife
Scotch Tape
Installation on manual passenger seat
Using the seat height lever on the side, lift the seat as far as it goes. On my ECO MT this gave me enough space to make a fist under the front of the seat and move it up and down about an inch.
Push the seat forward on the rails to give you room to reach under from behind. Reaching under the seat there will be two straps that stretch forward from the edge of the seat fabric. These straps end in plastic hooks that are about a third of an inch long. Pull the hooks forward until they come free. The bottom flap for the seat back will drop down.
Next, pull the end of the zippers from where they are tucked in behind the plastic seat corner on each rear corner. Carefully, and I mean carefully, unzip both zippers. I had one “split” and I ended up having to repair a zipper.

The seat cover is clipped onto the base and back. The base clip goes all the way across the base of the seat. The seat back fabric clip is one long plastic piece. The seat cushion is a short clip and a longer clip. The short clip just slides off. Use the flat head screw driver to very carefully separate the rest of the clip.
As you lift the seat back fabric you will find two clips going up each side and then two clips about half way up the seat back. Carefully remove these clips. Lift the seat back fabric and hook it around the raised head rest supports. Use the clips from under the seat to hold it in place. You are now ready to start the install.
Carefully slide the air bladder up between the metal grid and the foam seat back cushion. Face the bladder to the front so the protective “hard” plastic is pressed against the spring grid. This is a tight fit to start but once started it’s easy to move the air bladder around. Route the air hose out the lower inboard corner. Be careful to not kink the air hose.
Next use the scotch tape to secure the drill mask to the middle front of the plastic door side seat support. You want to cut a hole that fits the mask. I used a drill to drill some 5/8” overlapping holes to start the hole. I then used the file, pocket knife main blade, and drill with 1/16” bit to increase the size of the hole to fit the template. Put the control cable into this hole and very carefully snake it over the top of the interior frame. Go over the frame to avoid interfering with the forward/rearward movement of the seat on the rails. Put the cable in so the switch’s bulge is to the front. Pressing this bulge will inflate the bladder.
Under the seat there is another flap of fabric. This flap is also held to the seat bottom by a pair of stretch straps. Unclip them. Plug the air hose into the pump and then while holding the pump under the seat, reclip this flap over the pump. Zip tie the pump to the bottom of the seat.
Slide both seats all the way forward. On each side of the center console you will see a hex head screw. Remove both. Slide both seats all the way backwards. Using your fingers, carefully lift the gear shift trim and then lift the silver trim from around your shifter. Reach under the silver trim from the gear shift side. Start at the back and work your way forward unclipping as you go. Do NOT use a screw driver to lift as this plastic is very, very soft and a screwdriver will leave marks in the finish. Detailed instructions for this are in the first post of http://www.cruzetalk.com/forum/137-...dio-electrical-tutorials/5833-diy-bluetooth-a2dp-bluetooth-audio-streaming.html. Once the silver piece is removed flip it over and unscrew the traction control off button from the underside. Set the cover aside.
Next remove both inboard kick plates. Start from the bottom front of each plate and work your way back. There are two screws on each side of the center console that you unscrewed in the rear. Lower corner under the rear corner of the kick plates and on the front of the console just under the A/C control unit. Remove all four screws. Pay attention to your screws here as there are two screws close together on the top of the console. The lower screw on each side is the console cover and the upper secures the A/C controls. You can now lift the center console but it won’t come all the way out due to electrical cables.
From the front of the seat you can plug both the control cable and the power cable into the pump. Run the power cable over the seat frame. Note where the existing power cable dives into the floor. We’re going in there as well. Lift the floor flaps back and snake the cable under the front inboard corner and up into the center console area. You can slide your fingers in from the console side and catch the cable plugs and pull it through. On the front of the connector you'll see a flat plastic "cover". Pull this cover to unplug the connector, then you can remove remove the other half of the connector easily to give yourself more room to work the Rostra power cable under the floor padding and into the center console area. Resecure the existing plug in reverse order. The pull plastic now is a push plastic once properly seated. Very little force is needed to remove and resecure this connection.
Using a zip tie, secure the fuse to the top of the connector in the floor. This keeps it above any snow melt or other water that may find it’s way into this area and ensure sufficient slack under the seat to move it back and forth. Pull the power cable through all the way into the center console.
Slide the driver’s seat all the way back and lift the back of the center console and sit it on the top of the seat belt clasp stalks. Carefully reach up under the back of the seat and unclip the rear power outlet cable and pull it out to where you can see about four inches of cable. If you look under the front of the console you will see the same set up. Using the scicssors carefully cut back about two inches of the wrap from the power connector. Using the wire connector pinches put one on each electrical line. The Rostra black wire plugs into the black wire for the power clip. The Rostra red wire plugs into the purple wire clip.
Turn the ignition to power/run and and test. Pushing the button forward should increase lumbar support. Pushing it back while sitting in the seat will reduce lumbar support.
Plug the back power outlet back together and then use the zip ties to secure the Rostra power cable to the power cable that runs to the back of the console. There is extra space under the center console so you can leave the extra Rostra cable in there. Put the console back down into place and reattach the front of the console with the four screws. Reinstall the kick plates by inserting the front tab and then the rear tabs. Press the clips back into place. Reconnect the traction control switch to the silver trim and clip the trim back into place. Reseat the trim around the gear shift. Close up the floor flap.
Before securing the air bladder have the primary passenger test the position of the lumbar support. Once it’s good use zip ties to secure the bladder in place. Flip the seat cover back down and reconnect the two top clips and four side clips (two on each side). Reconnect the long clips at the bottom of the seat. Using your needle nose pliers pull down the two zippers. Be careful when you get to the bottom of the seats as this is where my zipper came apart. Tuck the zippers back in. Reclip the two bottom tabs under the seat.
Enjoy your new lumbar support.
Thanks to XtremeRevolution for putting together the Rostra CruzeTalk discount and for his write up. He has aftermarket leather seats in his car so my seat work is different. I didn’t feel like routing wires all the way to the fuse box so I used the existing 12v power outlet wiring.


