I'll be updating all the posts as I go... just keep in mind things will be slow or here n there as I assemble and reassemble the posts, thread last updated sept 8th 2024 still in progress.
Page one
Post #3 bearing race removal.
Post #4 input shaft tear down
Post #5 R 3rd 4th gear stack teardown
Post #6 1st,2nd,5th,6th gear stack tear down
Post #7 part number listings
Page two
Post #8 R,3rd,4th gear stack assembly.
Post #9 1,2,5,6th gear stack assembly.
Post #10 input shaft assembly.
Post#11 differential bearings/ shimming.
Post#12 bearing race insert and shimming.
Post #1
![Image]()
![Image]()
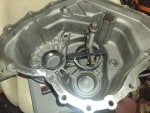
Figured this transmission is going to be a project by itself, cleaning the outside, cleaning the clutch jam inside, new bearings, and plumbing for oil cooler hookups.
![Image]()
Out of a 2014 LS est 164k km encased in grease.
I've had this for nearly two years, needing a replacement for my current 2012 LS, with 205k km, that has damaged bearings. Input bearing is starting to get loud, 1st is developing some stick play, and 3rd/ 4th has always wined since buying the car at 147k km but either gears having no play. Shifting is still good, and crisp. Having since gone to a clutch masters stage 1 clutch with aluminum flywheel. shifts are near intuitive now.
![Image]()
Clutch masters aluminum flywheel with stage 1 clutch. Bite is slightly improved/ more progressive. Clutch pedal is heavier. Shifting feels easier on the transmission and is easier to rev match / predict rpm for a cleaner shift. Feels worlds better then the heavy clutch. And as a bonus getting first gear from a cold start in winter is now a non issue blip the throttle 200rpm and it's in
![Image]()
Oil cooling. I magine two 3/8" bulkhead flare fittings, one draw, two supply to input bearing and side bearings via drilling out the pressed in ball. Then crushing the pipes to meter oil will do the trick. As for exterior wise I have a aftermarket "transmission cooler" and am looking into a pump, filter, and some type of temperature relay setup.
![Image]()
Should have room to run a line to feed that there input bearing.
Page one
Post #3 bearing race removal.
Post #4 input shaft tear down
Post #5 R 3rd 4th gear stack teardown
Post #6 1st,2nd,5th,6th gear stack tear down
Post #7 part number listings
Page two
Post #8 R,3rd,4th gear stack assembly.
Post #9 1,2,5,6th gear stack assembly.
Post #10 input shaft assembly.
Post#11 differential bearings/ shimming.
Post#12 bearing race insert and shimming.
Post #1
Figured this transmission is going to be a project by itself, cleaning the outside, cleaning the clutch jam inside, new bearings, and plumbing for oil cooler hookups.
Out of a 2014 LS est 164k km encased in grease.
I've had this for nearly two years, needing a replacement for my current 2012 LS, with 205k km, that has damaged bearings. Input bearing is starting to get loud, 1st is developing some stick play, and 3rd/ 4th has always wined since buying the car at 147k km but either gears having no play. Shifting is still good, and crisp. Having since gone to a clutch masters stage 1 clutch with aluminum flywheel. shifts are near intuitive now.
Clutch masters aluminum flywheel with stage 1 clutch. Bite is slightly improved/ more progressive. Clutch pedal is heavier. Shifting feels easier on the transmission and is easier to rev match / predict rpm for a cleaner shift. Feels worlds better then the heavy clutch. And as a bonus getting first gear from a cold start in winter is now a non issue blip the throttle 200rpm and it's in
Oil cooling. I magine two 3/8" bulkhead flare fittings, one draw, two supply to input bearing and side bearings via drilling out the pressed in ball. Then crushing the pipes to meter oil will do the trick. As for exterior wise I have a aftermarket "transmission cooler" and am looking into a pump, filter, and some type of temperature relay setup.
Should have room to run a line to feed that there input bearing.