How-To: 2011-2016 Cruze Antifreeze/Coolant Flush
Overview:
The DexCool antifreeze/coolant in the Cruze is rated for 5 years or 150,000 miles, whichever comes first. At the end of that service interval, it needs to be flushed out and replaced with new antifreeze. You can do this easily in your garage with some basic tools and a bucket.
Tools Required:
- 13mm socket & ratchet
- A clean 1+ gallon bucket
- Flathead screwdriver & needle nose pliers, or a plastic fastener removal tool (Available on amazon.com)
- A T-20 Torx bit and driver
- 2 feet of 5/16" or 1/4" hose (I used 5/16" since I had some old transmission cooler line laying around)
Parts Required:
- 4 gallons distilled water (No, you cannot use tap water. Water quality is critical with cooling systems. Distilled water is just $1 a gallon at any grocery store.)
- 1 gallon 100% concentrate antifreeze
Note: Everything I've read and experienced has noted that DexCool, when used according to its intended service life, is a reliable coolant to use. You can use whatever antifreeze you'd like for this, just pay close attention to its rated service life and make sure to flush it out when it has reached the end of that service life.
For my Cruze, I decided to use AMSOIL's Low Toxicity Propylene Glycol antifreeze, which is rated for 150,000 miles or 5 years (whichever comes first), just like DexCool. This antifreeze is compatible with DexCool and will not cause problems if they are mixed. The reason I chose this was due to its low toxicity (I have kids and a dog and this means I have to store one less toxic product), its excellent corrosion, scaling, and cavitation/pitting resistance, and the fact that it's biodegradable. You can purchase this here: AMSOIL Low Toxicity Antifreeze and Engine Coolant.
Procedure:
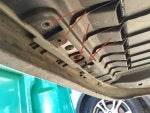
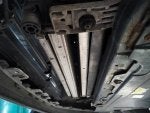
First, we will need to remove the under-body shield that sits directly underneath the radiator. Using the T-20 torx bit, remove the six screws holding it on (two are toward the outer edges)
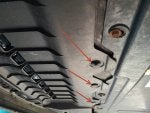
Next, remove the fasteners by lifting the centers out first, then removing the body. I used to do this with a flathead screwdriver and a pair of pliers, but discovered that a plastic fastener removal tool is much quicker.
Slide the shield backward, and you'll be able to see the A/C condenser, intercooler, and radiator.
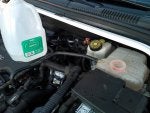
Take off the radiator cap. If the engine is hot, wait for it to cool down first.
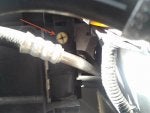
The drain valve is located on the passenger side of the vehicle, to the side of the radiator. It will look like this:
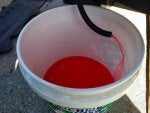
Fit a hose over the barbed fitting, place a bucket underneath the hose, and open the valve. It should loosen by hand. You don't need to take the valve completely out, just loosen it enough to allow the coolant to start pouring. Make sure the hose is secure, and make sure it isn't kinked at the initial outlet.
Next is the flushing process. It is really up to you how many times you want to flush the cooling system. I did it 5 times because I had 4 gallons of distilled water and that allowed me to use it all up. The more times you flush the system, the more of the old coolant you are able to replace. The system holds 5.8 quarts of coolant for the 1.4L. Draining the system using the valve will drain almost exactly 3 quarts (give or take depending on how your vehicle is angled).
To flush the system:
1. Close the valve on the bottom of the radiator
2. Wait 15 minutes for the engine to cool a bit so you don't cause a thermal shock when adding the cold water.
3. Fill up the reservoir with water and keep filling until the level stabilizes, being sure not to go higher than the seam of the reservoir
4. Turn on the car and let it heat up to operating temp. The idea here is to get the engine hot enough to open the thermostat so you can mix what's in the radiator with what's in the rest of the engine.
5. Once you've reached operating temp, turn the car off.
6. Wait 5 minutes for any hot spots in the engine to the normalize.
7. Open the drain valve and allow the mixture to drain.
8. Repeat for as many flushes as you want to perform.
Here's how much of the old fluid you will have remaining after each flush:
Flush 1: 2.8 quarts (48%)
Flush 2: 1.4 quarts (24%)
Flush 3: 0.75 quarts (13%)
Flush 4: 0.39 quarts (7%)
Flush 5: 0.20 quarts (3.4%)
After the 5th flush, you'll have replaced ~96.5% of the old fluid.
Once you've performed all your flushes, you should have the radiator empty with the drain valve closed. Since the system holds 5.8 quarts of fluid and opening the valve only drains 3 quarts, you should have 2.8 quarts remaining. Proceed to refill the cooling system with 100% concentrate coolant. It should only take about 3 quarts to get you to the correct level on the reservoir. This will get you to an almost exact 50/50 mix ratio.
To bleed the system, there is a valve on the passenger top of the radiator facing the rear of the car. You can use a large flathead screwdriver or a 13mm socket to open this valve. Open it and allow air to escape. Once coolant starts flowing out of it, close the valve, being sure not to over-tighten it (it's plastic after all).
Screw the cap back onto the reservoir, and go out for a drive. Once you get back, check the level to make sure it is still good, and if it hasn't gone down too much, you're all set. The system will continue to "burp" air bubbles, so check on the level every now and then for the first couple of weeks and top off as needed.