Chevrolet Cruze Forums banner

How-To: Change the Oil Cooler Seals

48K views 43 replies 12 participants last post by  Johnny B  
#1 ·
I am making this thread from information found elsewhere in the forum and some YouTube videos. I did not create or perform any of these items. Because of the research I had to do to answer someone else's question, I figured why not put it where all will find it.

From a post by @MyShibbyEco in Engine oil cooler replacement? (videos to follow):


Here are the steps in my service manual for a 1.4L LUH or LUJ engine.

REMOVAL

1) Disconnect battery negative cable. Refer to Battery Negative Cable Disconnection and Connection .
2) Drain engine coolant. Refer to Cooling System Draining and Filling
3) Remove the turbocharger oil feed pipe. Refer to Turbocharger Oil Feed Pipe Replacement .
4) Remove the warm up three way catalytic converter. Refer to Warm Up Three-Way Catalytic Converter Replacement .
5) Lower vehicle.
6) Remove the air cleaner outlet duct. Refer to Air Cleaner Outlet Duct Replacement .
2371623.png
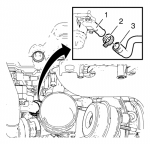
7) Remove the oil cooler outlet hose clamp (2).
8) Remove the oil cooler outlet hose (3) from the thermostat housing (1).
2371624.png
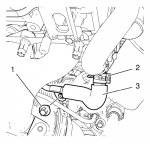
9) Remove the turbocharger coolant return pipe bolt (1) from the oil cooler housing.
10) Remove the turbocharger coolant return pipe clamp (2).

Note: Do not move the turbocharger coolant return pipe too much. An excessive moving of the turbocharger coolant return pipe could cause leakage.

11) Remove the turbocharger coolant return pipe (3) from the oil cooler inlet pipe.
12) Disconnect the oil pressure indicator switch wiring harness plug.
2371629.png
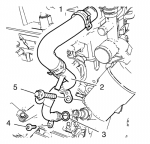
13) Remove the oil cooler inlet hose clamp (1) and remove the oil cooler inlet hose from the water outlet.
14) Remove the engine oil cooler bolt (5).
15) Remove the engine oil cooler inlet pipe bolt (4).
16) Remove the engine oil cooler inlet pipe (2) and the seal ring (3).
17) Raise vehicle.
2371625.png
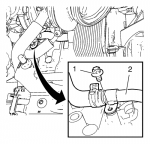
18) Remove the oil cooler outlet pipe bolt (1) from the engine block.
19) Remove the oil cooler outlet pipe (2) in compound with the oil cooler outlet hose.
20) Lower vehicle.
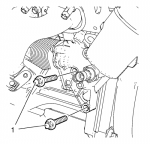
2371626.png
21) Remove the 2 oil cooler bolts (1).
22) Raise vehicle.
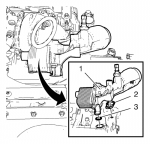
2371627.png
23) Remove the oil cooler (1) in compound with the oil cooler gasket (2) and the seal ring (3).
24) Remove the oil pressure indicator switch from the oil cooler.

INSTALLATION

1) Install the oil pressure indicator switch to the oil cooler. Use a NEW seal ring.

Caution: Refer to Fastener Caution in the Preface section.

2) Tighten the oil pressure indicator switch to 20 N·m (15 lb ft).
2371627.png
3) Clean the sealing surfaces.
4) Install the oil cooler (1) in compound with a NEW oil cooler gasket (2) and a NEW seal ring (3).
5) Lower vehicle.
2371626.png
6) Install the 2 oil cooler bolts (1) and hand tighten.
2371629.png
7) Install the engine oil cooler inlet pipe (2) in compound with a NEW seal ring (3).
8) Install the oil cooler inlet hose to the water outlet and install the oil cooler inlet hose clamp (1).
9) Install the engine oil cooler bolt (5).
10) Install the engine oil cooler inlet pipe bolt (4) and tighten to 10 N·m (89 lb in).
11) Tighten the 3 engine oil cooler bolts to 20 N·m (15 lb ft).
2371624.png
12) Install the turbocharger coolant return pipe (3) to the oil cooler inlet pipe.
13) Install the turbocharger coolant return pipe clamp (2).
14) Install turbocharger coolant return pipe bolt (1) and tighten to 10 N·m (89 lb in).
15) Connect the oil pressure indicator switch wiring harness plug.
16) Raise vehicle.
2371625.png2371623.png
17) Install the oil cooler outlet pipe (2) in compound with the oil cooler outlet hose to the oil cooler.
18) Install the oil cooler outlet pipe bolt (1) to the engine block and tighten to 10 N·m (89 lb in).
19) Install the warm up three way catalytic converter. Refer to Warm Up Three-Way Catalytic Converter Replacement .
20) Install the oil cooler outlet hose (3) to the thermostat housing (1).
21) Install the oil cooler outlet hose clamp (2).
22) Install the air cleaner outlet duct. Refer to Air Cleaner Outlet Duct Replacement .
23) Install the turbocharger oil feed pipe and the exhaust manifold heat shield. Refer to Turbocharger Oil Feed Pipe Replacement .
24) Connect battery negative cable. Refer to Battery Negative Cable Disconnection and Connection .
25) Fill engine coolant. Refer to Cooling System Draining and Filling .

 
#2 ·
Plan on attempting this soon, mine is still seeping.

Part numbers for seals are:

55565385
55568536
55568539


Not sure if I will remove the manifold and turbo or not. Seems it can be done without doing so, but I just don't know. All the videos show removing it.
 
#35 · (Edited)
First of all, given that the 1.8 and 1.4 oil coolers are different, let me state that the below applies to the 1.4.

Just to summarize, I believe the full parts list is:
1x 55565385
1x 55568536
1x 55568539
2x 55568540

55568540 appears to be the o-ring for the coolant inlet and outlet pipe seals to the oil cooler. If you buy the pipes (inlet 55565382, outlet 55583808), they will come with those o-rings. (Note that 55583808 = 55583807 + hose clamp + outlet pipe + o-ring.) However, I believe the (presumably aluminum) piping can be re-used, and all that needs to be replaced are the o-rings ("seals"). (Looks like is the outlet pipe o-ring on the 1.8 is 25194222, but this does not apply to 1.4).

Justification that the inlet pipe o-ring = 55568540 can be found on US GM wholesaler website diagrams.

However, it is less clear that the outlet pipe o-ring is equivalent. I didn't want to take the chance, so bought the whole 55583808 assembly for $5 more than for 55583807+55568540. However, the diagram in this post (Engine Oil Cooler leaking) and the description of the following Russian video both seem to indicate that 55568540 works for outlet pipe o-ring as well:

There are also some (non-US) vendors that package this set of seals together as well: https://rosteco.ru/products/proklad...ducts/prokladki-adaptera-i-korpusa-maslyanogo-filtra-GM-KIT-ROSTECO-silikon-k-t
 
#3 ·
The deed is done, what a bi#$@. Just remove the turbo, you end up saving time. Also, lost a lot more oil than I expected. It doesn't come out easily or at all without doing so. The green orings on the turbo oil line are ripped and seeping now, not sure how, its a relatively new part, anyway other than that it seems all ok now. I'm embarrassed to say how long it took me.

289930


289931


289932


289933
 
#4 ·
The deed is done, what a bi#$@. Just remove the turbo, you end up saving time. Also, lost a lot more oil than I expected. It doesn't come out easily or at all without doing so. The green orings on the turbo oil line are ripped and seeping now, not sure how, its a relatively new part, anyway other than that it seems all ok now. I'm embarrassed to say how long it took me.
Plan on writing a how to? With Tips!
 
#24 ·
I'm about to do this job on my 2011 Eco. Just to clarify, it is the replaceable seals in the oil cooler that are likely the issue, and not some unrepairable issue within one of the assemblies of the oil cooler, correct? I only want to do this once, but would rather not replace the entire oil cooler if just replacing the seals will suffice.

Now at 11 years and ~123k miles, I probably should replace any hose, o-ring, or seal that I disturb in the process. Anything else I should replace while I'm in here?
 
#25 ·
I'm about to do this job on my 2011 Eco. Just to clarify, it is the replaceable seals in the oil cooler that are likely the issue, and not some unrepairable issue within one of the assemblies of the oil cooler, correct? I only want to do this once, but would rather not replace the entire oil cooler if just replacing the seals will suffice.

Now at 11 years and ~123k miles, I probably should replace any hose, o-ring, or seal that I disturb in the process. Anything else I should replace while I'm in here?
Yes to replacing things you disturb. I think maybe the only thing in there may be a check valve to be cleaned, but I am not sure.

@Thebigzeus @JLL
 
#27 ·
Alright, got my two boxes of parts from RockAuto. Hopefully it'll be nice enough in the garage this weekend to get this done.

You guys that have done this, and taken the exhaust manifold off, did you replace the manifold nuts? If so, where did you get them? I haven't been able to find a part number or anything for them.
 
#28 ·
Alright, got my two boxes of parts from RockAuto. Hopefully it'll be nice enough in the garage this weekend to get this done.

You guys that have done this, and taken the exhaust manifold off, did you replace the manifold nuts? If so, where did you get them? I haven't been able to find a part number or anything for them.
I resused mine, twice. Because the first time I put the exhaust gasket on the wrong side lol
 
#29 ·
After a 5-hour day yesterday (which included about an hour run to harbor freight to get a set of 1/4" drive deep well E-torx sockets...couldn't get clearance to get the turbo oil return line off), I'm halfway there. What a giant pain. I got hung up for awhile trying to get the two coolant lines off the turbo. The clamp between the two halves of the turbo was clocked different on mine than on the tutorial here, so I couldn't get a wrench on the lines to remove them, so I cut one and removed the other at the engine block. I'm now going to be stuck waiting for parts again, as I'm ordering all of the rest of the coolant lines I couldn't see or identify when it was all still assembled. I'm also getting the turbo to intercooler intake hose, as that was loose on the intercooler end and probably leaking.
 
#30 ·
I have the 1.8 Liter. No turbo.
My oil cooler has been leaking for awhile, but it just leaked as if it were stabbed by a murderer. Left a big puddle on the ground. So I finally had to take the cooler off to get to the gaskets.

In videos with my engine I see people struggle to get heat shield and exhaust manifold off. What is happening is the a/c line is so tense, and sticks out so far from the radiator, that it forces you to pull the heat shield and manifold out with a lot of force.

My suggestion is too disconnect the A/C compressor from the engine (Don't disconnect the lines). The compressor will drop out of the way, and take the obstructing a/c line with it. It it will give you plenty of wiggle room to remove the manifold.

Remove the belt, disconnect the wire, and the compressor (On my Cruze) is held to the block by 3 bolts. One of the easiest thing on this car to remove, and replace. A whole lot easier than fighting the a/c lines.
 
#36 ·
Hello Guys,

I've just finished re-installation of my oil cooler and unfortunately it's leaking from connection between thermostat and oil coller.
I did not put the OEM o-rings there just some that I've had with almost the same size, probably this is the reason.

However I cannot believe how this thing can not leak... It's holding only with the o-ring and the water there is under pressure. (in my case it started to leak even before turning the engine, during filling up the coolant...)
How the hell it can work? That pipe is loosen and not strongly inserted into oil cooler, because we need to tighten it into engine what actually require to pull the connection a little bit back from the cooler.

 
#37 ·
Great write up, watched all the videos. I thought I had ordered everything and prepped for replacing the oil cooler assembly tomorrow, but after reviewing this post again, I did not order a new seal for the pressure switch.

Does anyone have the part # for the seal?

INSTALLATION

1) Install the oil pressure indicator switch to the oil cooler. Use a NEW seal ring.

Thanks!
 
#38 ·
Great write up, watched all the videos. I thought I had ordered everything and prepped for replacing the oil cooler assembly tomorrow, but after reviewing this post again, I did not order a new seal for the pressure switch.

Does anyone have the part # for the seal?

INSTALLATION

1) Install the oil pressure indicator switch to the oil cooler. Use a NEW seal ring.

Thanks!
Is it leaking? I left mine alone.
 
#41 · (Edited)
I have returned! I got owned by the two hoses that attach to the top of the oil cooler.

My recommendation is, be prepared for the two hoses attached to it, to not come off without tearing. Be prepared to purchase replacement hoses just in case.

I drained, coolant, oil, transmission fluid.

Removed turbo oil feed line, removed catalytic converter. Began unbolting the oil cooler assembly, unplugged oil pressure switch.

The hoses pictured here, would not come off. Attempted to insert a pick tool to work them off, they would not come off. The remote clamp tool I bought off Amazon, was really good at taking the clamps off without drama, but the hoses didn't want to come off.

Image

These are the pipes.

This is the extent of the oil cooler leak. Lots of oil everywhere, but the car runs fine and throws no codes.

Image

Image


Also if you remove the intercooler pipe that goes to the bottom of the turbo. The diamond shaped metal ring that clips it to the intercooler. That ring clips around the outside of the pipe. It does not go inside and then outside of the pipe. I spent an embarrassing amount of time trying to put the new one back in, only to realize I am a fool.

Also my plan for the aluminum pipe bolt that goes out of the left side of the intercooler was to get at it from underneath after the cat was off. That seems like it would work with the right extension. Because I didn't want to remove the exhaust + turbo.

Another useful tip would be to spray PB Blaster onto the cat bolts. They come off with no drama after that.

Also i put blue threadlocker onto the 3 oil cooler assembly bolts that i took off.

This is all easier with a lift. I used the auto hobby shop on my local Army installation. 5.5 hours for $60.

I will attempt replacement again after I get those 2 hoses.

Also I would just like to add an updated link to this article which was posted here. You can have a Crack in the turbo wastegate, it doesn't mean you need to replace your turbo. https://techlink.mynetworkcontent.com/wp-content/uploads/2017/06/GM_TechLink_08_Mid-April_2017.pdf

Mine is cracked as well, but no codes, and does not affect how it drives.

Image

Image


Super blurry, but the Crack is visible.
 
#42 ·
I have returned! I got owned by the two hoses that attach to the top of the oil cooler.

My recommendation is, be prepared for the two hoses attached to it, to not come off without tearing. Be prepared to purchase replacement hoses just in case.

I drained, coolant, oil, transmission fluid.

Removed turbo oil feed line, removed catalytic converter. Began unbolting the oil cooler assembly, unplugged oil pressure switch.

The hoses pictured here, would not come off. Attempted to insert a pick tool to work them off, they would not come off. The remote clamp tool I bought off Amazon, was really good at taking the clamps off without drama, but the hoses didn't want to come off.

View attachment 303871
These are the pipes.

This is the extent of the oil cooler leak. Lots of oil everywhere, but the car runs fine and throws no codes.

View attachment 303872
View attachment 303873

Also if you remove the intercooler pipe that goes to the bottom of the turbo. The diamond shaped metal ring that clips it to the intercooler. That ring clips around the outside of the pipe. It does not go inside and then outside of the pipe. I spent an embarrassing amount of time trying to put the new one back in, only to realize I am a fool.

Also my plan for the aluminum pipe bolt that goes out of the left side of the intercooler was to get at it from underneath after the cat was off. That seems like it would work with the right extension. Because I didn't want to remove the exhaust + turbo.

Another useful tip would be to spray PB Blaster onto the cat bolts. They come off with no drama after that.

Also i put blue threadlocker onto the 3 oil cooler assembly bolts that i took off.

This is all easier with a lift. I used the auto hobby shop on my local Army installation. 5.5 hours for $60.

I will attempt replacement again after I get those 2 hoses.

Also I would just like to add an updated link to this article which was posted here. You can have a Crack in the turbo wastegate, it doesn't mean you need to replace your turbo. https://techlink.mynetworkcontent.com/wp-content/uploads/2017/06/GM_TechLink_08_Mid-April_2017.pdf

Mine is cracked as well, but no codes, and does not affect how it drives.

View attachment 303874
View attachment 303875

Super blurry, but the Crack is visible.
Mine looks like that and I have had no issues for quite some time. $10 an hour for the shop. Last time I used one it was only$3 if that tells you anything
 
#44 ·
Fwiw, I just finished this job. What a pita, took about 6 hours and I had help. Also, I should have done this...
My suggestion is too disconnect the A/C compressor from the engine (Don't disconnect the lines). The compressor will drop out of the way, and take the obstructing a/c line with it. It it will give you plenty of wiggle room to remove the manifold.
Those AC lines were constantly in the way.(n)