

Here's a little guide to help you remove the centre silver trims around the radio and hvac controls on a 2011 North American Cruze (and 2012, though clips may be in different locations, i don't know for sure).First thing is first, get yourself a dashboard trim removal tool. Any auto place should sell them, either in kits or by themselves. DONT USE A SCREWDRIVER! You'll scratch the **** out of everything and they aren't wide enough to release the clips without indenting the plastic or, at worst, cracking it. Before we begin, these are the two trims I'm referring to:
![]()
![]()
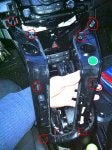
Removal is actually quite simple. It's only a matter of taking a removal tool and prying at where the clip points are. Here are some photos of where the clip points are and where you should use the tool to pry at. Again, its important to use the proper tools, because a screwdriver is likely to just indent the plastic rather than pop the clip. Once the clips have release the trim, gently wiggle it back and up, but BE CAREFUL! there are 2 wire harnesses connecting to the Stabilitrac button and gear position details in place. This is where the earlier European Cruzes and NA Cruzes differ. The only guides I was able to find so far picture the European Cruze, which doesn't have the two details on the U Trim. First, the U shaped trim:
![]()
![]()
The photo below is the Stabilitrac button harness. It's a simple pull to remove coupling. Like most car connectors, they're in there pretty good so give it a manly tug and it should release.
![]()
The next photos are of the gear position detail. It's a view from above as you see it from the passenger seat. Disconnect the white connector (circled) first then slide the entire harness back to remove it from the trim. It will slide back where the square is around. Take note of how the wire wraps around the holding post, try to assemble it back the way it was. Photos are of before and after removal.
![]()
![]()
That's it for that, do as you will with it. Personally, I wrapped mine in carbon fibre vinyl (for now). To remove the button and gear position detail just remove the screws and take them off. Don't forget to do this if you're gonna paint your silver trim another colour.


Removal is actually quite simple. It's only a matter of taking a removal tool and prying at where the clip points are. Here are some photos of where the clip points are and where you should use the tool to pry at. Again, its important to use the proper tools, because a screwdriver is likely to just indent the plastic rather than pop the clip. Once the clips have release the trim, gently wiggle it back and up, but BE CAREFUL! there are 2 wire harnesses connecting to the Stabilitrac button and gear position details in place. This is where the earlier European Cruzes and NA Cruzes differ. The only guides I was able to find so far picture the European Cruze, which doesn't have the two details on the U Trim. First, the U shaped trim:

The photo below is the Stabilitrac button harness. It's a simple pull to remove coupling. Like most car connectors, they're in there pretty good so give it a manly tug and it should release.

The next photos are of the gear position detail. It's a view from above as you see it from the passenger seat. Disconnect the white connector (circled) first then slide the entire harness back to remove it from the trim. It will slide back where the square is around. Take note of how the wire wraps around the holding post, try to assemble it back the way it was. Photos are of before and after removal.


That's it for that, do as you will with it. Personally, I wrapped mine in carbon fibre vinyl (for now). To remove the button and gear position detail just remove the screws and take them off. Don't forget to do this if you're gonna paint your silver trim another colour.


