Chevrolet Cruze Forums banner
121 - 140 of 154 Posts
Thank you for all this information! I replaced the valve cover, spark plugs and ignition coil on my 2013 Cruze LTZ. I had random power drops under acceleration (misfires reported on Torque app randomly across all 4 cylinders) and an oil leak on the front on the valve cover. No faults were reported other than a P0442 Evap Emision Control System Leak Detected (small leak) but this was caused by an improperly tighten fuel tank cap (I'll keep an eye on it for sure).

I found 4 small cracks in the valve cover gasket that probably explain the oil leak.

284959


284960


For the first 40K miles I used that semi synthetic ACDelco oil my dealership was offering before Andrei got me Amsoil Signature. I now have 80K miles.

284961


I am not sure about this gunk, but I cleaned all of that.

284962


284963


This is after getting everything clean.

284964


I used this RTV to seal those two areas on the left: Permatex sealant. I made a mistake when removing the original valve cover and slightly damaged the surface of the engine block on the lower right side. I used some 150 sandpaper to clean that up and added a tiny bit of sealant in that area.

I will take it out for a drive today and provide some feedback after putting some miles on it. The next thing I am planning to replace will be the intake manifold.
 
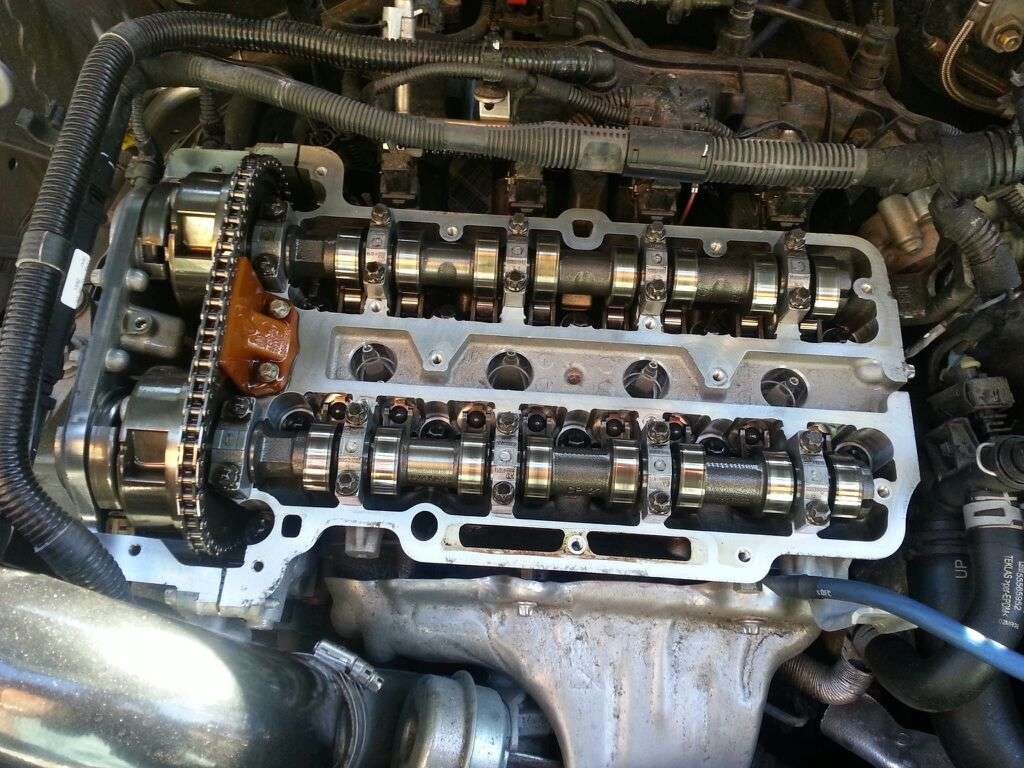
Once you have all of the screws loosened, lift the valve cover off. If it does not come off easily, you can use an interior trim tool remover to wedge the valve cover up off of the cylinder head. Whichever tool you use, be very careful not to scar the cylinder head gasket surface. If you have to, you can remove all of the bolts from the valve cover, but it isn't absolutely necessary. It will be easier to remove the valve cover if you lift from the front so you don't snag the wiring harness with the rear. Once you have the valve cover off, this is what you'll see:
Image


My particular Cruze had ~35,500 miles on it at this time. I took some pictures of the various valvetrain components:
Image

Image

Image

Image

Image

Image


Here, you will see the PCV ports inside the cylinder head:
Image

Image


After you're done admiring your shiny valvetrain (or recovering from the horror of the sludge you found from using a crappy oil), remove the snap retainer from the old valve cover and put it on the new one.
Image


IMPORTANT: use compressed air or brake clean to blow out any oil that may be inside the bolt holes. Oil is not compressible and will cause you to strip the threads while tightening if left in there.

Before installing the valve cover, you will need to clean off the old engine sealer at the two joints between the timing cover and the cylinder head, and apply a bead of sealer at those points, shown here:
Image


Check the valve cover to make sure the gasket is still snugly attached to it. Put the new valve cover on. I recommend sliding it in at an angle so you can tuck underneath the wiring harness.
Image


Tighten the bolts down by hand with just the socket end until they are snug. Once you have them all even and snug, go around in as star-like of a pattern as you can and tighten them until they are snug but not tight with your ratchet. Unlike valve covers of the past, these actually have a sleeve, and what you tighten down is the sleeve. The gasket acts as a spring for the valve cover itself, and the sleeve holds it down. The correct torque spec for this is 71 inch-pounds, NOT foot-pounds, so these really don't need to be very tight at all. Just snug.
Image

Image


Once you have all the bolts snug, start putting everything back into place. Start with the plastic bar you removed earlier. This should just slide right back in and lock with a snap.
Image


Secure the harness with the snap retainer. Don't forget about the plastic vacuum line underneath!
Image


Get the rest of the harness tucked inside the retainers:
Image


Before you put the coil assembly back in, look inside the spark plug boots and check the springs. Those like to snag and bend inside the boot. Wiggling the boot around a bit usually frees them up. Make sure they're all straight, then evenly press the bar back down. Reconnect the connector, and push the connector lock back in.
Image


Reinstall the oil cap, dipstick, and coil assmebly cover, and you're done!
Image


As a precaution, start up your car and let it idle. With a flashlight, check the edges of the valve cover to make sure there are no leaks.


Important note: be careful not to get any dirt or oil into the bolt holes. If you do, oil doesn't compress and neither does dirt, and you can easily strip the thread or break the bolt. If you suspect you got any dirt or oil in those holes, blow them out with compressed air. You should be able to screw those bolts in by hand freely until they need to be tightened. If you can't and you start finding a significant amount of resistance, you have debris inside and you need to use a tap to clean out the threads. Just something to be mindful of when you're doing this.

For the locking tab, that keeps the plug clipped onto the right side, you said it is easy to break. Well, I broke it. Lol.
How easy is it to replace that piece?
 
Discussion starter · #123 ·
For the locking tab, that keeps the plug clipped onto the right side, you said it is easy to break. Well, I broke it. Lol.
How easy is it to replace that piece?
Not easy to my knowledge, but check with the dealer and see if they have a replacement. Just secure that in there as firmly as you can and cross your fingers. Worst case find a cruze in a junkyard and pull the clip off.

Sent from my BlackBerry Key2 using Tapatalk
 
Not easy to my knowledge, but check with the dealer and see if they have a replacement. Just secure that in there as firmly as you can and cross your fingers. Worst case find a cruze in a junkyard and pull the clip off.

Sent from my BlackBerry Key2 using Tapatalk
Ok, thanks! And already pushed it in firmly, and fingers are crossed ???
 
Once you have all of the screws loosened, lift the valve cover off. If it does not come off easily, you can use an interior trim tool remover to wedge the valve cover up off of the cylinder head. Whichever tool you use, be very careful not to scar the cylinder head gasket surface. If you have to, you can remove all of the bolts from the valve cover, but it isn't absolutely necessary. It will be easier to remove the valve cover if you lift from the front so you don't snag the wiring harness with the rear. Once you have the valve cover off, this is what you'll see:
Image


My particular Cruze had ~35,500 miles on it at this time. I took some pictures of the various valvetrain components:
Image

Image

Image

Image

Image

Image


Here, you will see the PCV ports inside the cylinder head:
Image

Image


After you're done admiring your shiny valvetrain (or recovering from the horror of the sludge you found from using a crappy oil), remove the snap retainer from the old valve cover and put it on the new one.
Image


IMPORTANT: use compressed air or brake clean to blow out any oil that may be inside the bolt holes. Oil is not compressible and will cause you to strip the threads while tightening if left in there.

Before installing the valve cover, you will need to clean off the old engine sealer at the two joints between the timing cover and the cylinder head, and apply a bead of sealer at those points, shown here:
Image


Check the valve cover to make sure the gasket is still snugly attached to it. Put the new valve cover on. I recommend sliding it in at an angle so you can tuck underneath the wiring harness.
Image


Tighten the bolts down by hand with just the socket end until they are snug. Once you have them all even and snug, go around in as star-like of a pattern as you can and tighten them until they are snug but not tight with your ratchet. Unlike valve covers of the past, these actually have a sleeve, and what you tighten down is the sleeve. The gasket acts as a spring for the valve cover itself, and the sleeve holds it down. The correct torque spec for this is 71 inch-pounds, NOT foot-pounds, so these really don't need to be very tight at all. Just snug.
Image

Image


Once you have all the bolts snug, start putting everything back into place. Start with the plastic bar you removed earlier. This should just slide right back in and lock with a snap.
Image


Secure the harness with the snap retainer. Don't forget about the plastic vacuum line underneath!
Image


Get the rest of the harness tucked inside the retainers:
Image


Before you put the coil assembly back in, look inside the spark plug boots and check the springs. Those like to snag and bend inside the boot. Wiggling the boot around a bit usually frees them up. Make sure they're all straight, then evenly press the bar back down. Reconnect the connector, and push the connector lock back in.
Image


Reinstall the oil cap, dipstick, and coil assmebly cover, and you're done!
Image


As a precaution, start up your car and let it idle. With a flashlight, check the edges of the valve cover to make sure there are no leaks.


Important note: be careful not to get any dirt or oil into the bolt holes. If you do, oil doesn't compress and neither does dirt, and you can easily strip the thread or break the bolt. If you suspect you got any dirt or oil in those holes, blow them out with compressed air. You should be able to screw those bolts in by hand freely until they need to be tightened. If you can't and you start finding a significant amount of resistance, you have debris inside and you need to use a tap to clean out the threads. Just something to be mindful of when you're doing this.
I have done that repair 3 times already I expect to do it at least 2 more times maybe 3
 
This only happens with the 1.4T? I have 62,000 miles and everything seems to be fine. Should I replace mine as a precaution? I have the 1.8L
You're about at the maximum I would definitely replace it because if it goes you're stranded I would always recommend to everyone to change your serpentin belt I changed mine at 90000 miles and it looked absolutely perfect but truthfully they probably could have made it to a 190000 But with something like that you're better safe than sorry I wouldn't hit a 100 miles with it If you haven't already I would clean your throttle body Recommend using super
 
How-To: Replace the Valve/Camshaft Cover (1.4L Turbo)

Overview
The valve cover of the 1.4L Turbo engine houses the PCV system. Whether due to a leak in the gasket or a failure in the PCV system, this valve cover may need to be replaced. It is covered under the 5 year, 100,000 mile warranty from GM, but you may choose to perform the service yourself under certain conditions. The valve cover was at one point redesigned due to a high rate of failure. As my dealership is a significant distance away from me, it is more cost-effective given the value of my time to order this part and install it myself. In addition, I like to replace known defective parts ahead of time as preventive maintenance.

The following image compares the primary cosmetic difference between the old design and the new one. The old design is on top, new design is on the bottom. The new design has a ramped vent.

Part Number & Cost
GM part number 25198874 (Camshaft cover with bolt and seal), Available on Amazon.com. The valve cover comes as a kit, which includes gaskets and bolts pre-assembled. You will also need some RTV silicone or engine sealer.

Required Tools
Flathead screwdriver
T-30 torx screwdriver/bit
E-10 socket and ratchet (Available on Amazon.com)
In-lb torque wrench (Available on Amazon.com)

Procedure
The procedure is in fact rather simple, but I will walk you through it step by step.

The first step will be to remove the ignition coil cover. It's that piece of plastic on the top of your engine that "ECOTEC." Once you lift it off, you will see the ignition coil assembly. Remove the two torx screws with a T-30 torx bit/screwdriver.
Image

Image


Once you remove the screws, set them aside in a safe place. You will need to remove the coil assembly. This has to be done carefully as it can break. Do not use a screwdriver. Grab the assembly with two hands as shown, and lift evenly. Apply a very slight see-saw motion as you lift if necessary.
Image

Image


Once you have the coil bar removed, you will need to disconnect it from the wiring harness. To do this, you will need to slide back the connector lock. This will be an orange tab on the connector. Be careful while sliding this out as it can break easily. Once you have slid back the lock, you should be able to press down on the tab to disconnect the connector from the harness. The following image shows the connector with the lock slid back.
Image


On the rear right of the engine, lift the harness out of its seat:
Image

Image


When you reach the left side, you will need to wedge a screwdriver in the snap retainer to free the harness.
Image


Underneath the snap retainer, there is located a plastic vacuum line. Remove this as well. It will simply pop out of its retainer.
Image


On the left side of the cover, lift the harness out of the retainers:
Image


Below the harness, there will be a plastic bar that holds some additional wiring. You will need to use the screwdriver to hold back the retaining clips so you can remove this. It took me a little while to figure out which way to push the tab, but once you have it right, the bar should should lift up and out.
Image


Using an E10 socket, loosen all of the bolts until they can be lifted.
Image

Image


Remove the oil fill cap and dipstick:
Image
thank you your post is very informative, I purchased a new valve cover seal and it came with o-rings for the bolts. has anyone ever used them? Thanks.
 
I replaced mine last week and no o-rings for the bolts. OEM cover. It's funny cause the cam cover had the 2 day amazon free shipping, but when I tried to order the cspav seals or other parts, it was a month long shipping cause of the Corona virus. For some reason the cover did not have the month long shipping date
 

Attachments

I did the valve cover replacement along with the V3 PCV valve fix from Andre, unfortunately, I didn't pay too much attention to the screw holes for any oil residues on them. Tighten the bolts to 71in-lb but I noticed I got a leak on the upper left corner of the cover. I also noticed a lot of carbon/ hard oil around the camshaft where the gasket sits and wasn't too careful about cleaning it and ended up scratching the aluminum. I'll try removing it and re-applying the cover using the 150 sandpaper someone suggested and applying a bit extra of RTV on those corner spots. Crossing my fingers everything goes well
 
I did the valve cover replacement along with the V3 PCV valve fix from Andre, unfortunately, I didn't pay too much attention to the screw holes for any oil residues on them. Tighten the bolts to 71in-lb but I noticed I got a leak on the upper left corner of the cover. I also noticed a lot of carbon/ hard oil around the camshaft where the gasket sits and wasn't too careful about cleaning it and ended up scratching the aluminum. I'll try removing it and re-applying the cover using the 150 sandpaper someone suggested and applying a bit extra of RTV on those corner spots. Crossing my fingers everything goes well
I advise against sandpaper, surely nothing coarser than 400 or maybe 320. I'd be afraid of 150 leaving scratches that leak. The rubber gasket cannot conform to those tiny valleys, but the hot oil can get thru them.

To get the baked-on crud off, get some hard plastic scrapers. They won't leave any scratches. After that, some solvent on a rag to wipe off the surface. (I used lacquer thinner, but carburetor cleaner will probably work, too.) I think I got my scrapers at Northern Tool, or maybe Harbor Freight.

If you have noticeable scratches, a little RTV is probably in order in those spots.

Doug

.
 
Interesting development on these parts. I called my local GM dealer here (Saskatoon, Canada) to order the part and was told they can't sell them directly to the public anymore; they must be installed by them in the shop. Seems like a recall situation should be coming soon.

Edit: just got a call back from them saying the camshaft cover is a recall item as long as your car is under 193,000 km (120,000 miles)
You can buy it from Amazon
 
I probably have a replacement that would have been covered, I just need to go through my receipts to hopefully get a refund (according to the letter). Unfortunately, I'm at 138k miles now so it's out of warranty (again).
 
Hello, I have replaced the valve cover on 2010 Holden Cruz CD but I noticed smoke coming out of the engine when I turned my car on.

Things I haven't done, I didnt rub oil on the new gasket (someone said to do this?), also haven't used a torque wrench. Some say to use 89lbs others say 71?

Lastly, apparently there is format of closing the bolts which I'm unsure. What do you mean by the star method? Thanks
 
This is for the gas 1.4l, it shows the sequence for tightening down the bolts. You go in a pattern like that so one side of the head/cover doesn't tighten down before a different part. The diesel head should be similar (I could not find a diagram specific to the 2.0L specifically)
 
[QUOTE = "XtremeRevolution, message: 754985, membre: 4009"]
Le nouveau couvercle de valve est censé être une conception améliorée qui n'échoue pas aussi facilement. Je ne sais pas pourquoi votre deuxième a commencé à fuir à 80k. Certaines personnes ont signalé que leur couverture d'origine avait échoué dès 30k miles. Gardez à l'esprit que vos conditions de conduite sont beaucoup plus légères et plus cohérentes que celles de tout le monde.

Je suis curieux de connaître la cause de l'échec.
[/CITATION]
mon couvercle de soupape oem y a changé à 190000 km et l'admission à la société dorman
 
121 - 140 of 154 Posts